IBM db2 installation tutorial
table of contents:
preparation
os:
1
2
3
4
[root@node3 server]# uname -a
Linux node3.dev.lei 2.6.32-431.el6.x86_64 #1 SMP Sun Nov 10 22:19:54 EST 2013 x86_64 x86_64 x86_64 GNU/Linux
[root@node3 server]# cat /etc/redhat-release
Red Hat Enterprise Linux Server release 6.5 (Santiago)product files:
- installation package:DB2_Svr_10.5.0.3_Linux_x86-64.tar.gz
- fixpack: v10.5fp5_linuxx64_universal_fixpack.tar.gz
- license file: ESE_AUSI_QS_Activation_10.5.0.4.zip
- DB2 Setup wizard: run ./db2setup
- Response file
- db2_install command: run ./db2_install
install db2
2.1 extract the product file and change directory into the product directory
1
2
3
[root@node3 ~]# gzip -d DB2_Svr_10.5.0.3_Linux_x86-64.tar.gz
[root@node3 ~]# tar -xvf DB2_Svr_10.5.0.3_Linux_x86-64.tar
[root@node3 ~]# cd server2.2 prerequisites
- enter
./db2prereqcheck -icommand to check the installation requirements1
2
3
4
5
6[root@node3 server]# ./db2prereqcheck -i
Requirement not matched for DB2 database "Server" . Version: "10.5.0.3".
Summary of prerequisites that are not met on the current system:
...
DBT3514W The db2prereqcheck utility failed to find the following 32-bit library file: "libstdc++.so.6".
... - find the necessary libraries and install them
1
2
3
4
5
6
7
8
9
10[root@node3 server]# yum install -y libstdc++.x86_64
[root@node3 server]# yum install -y libstdc++.i686
[root@node3 server]# yum install -y pam.x86_64
[root@node3 server]# yum install -y pam.i686
[root@node3 server]# yum install -y libibmad.x86_64
[root@node3 server]# yum install -y libcxgb3.x86_64
[root@node3 server]# yum install -y ibutils.x86_64
[root@node3 server]# yum install -y ibsim.x86_64
[root@node3 server]# yum install -y librdmacm.x86_64
[root@node3 server]# yum install -y libibcm.x86_64 - run
./db2prereqcheck -iagain to make sure all the requirements matched.
- enter
2.3 enter
./db2_installcommand to start installation, then choose thedefault directory,product name, andpureScale Feature.1
2
3
4
5
6
7
8
9
10
11
12
13
14
15
16
17
18
19
20
21
22
23
24
25
26
27
28
29
30
31
32
33
34
35
36
37
38
39
40[root@node3 server]# ./db2_install
DBI1324W Support of the db2_install command is deprecated. For
more information, see the DB2 Information Center.
Default directory for installation of products - /opt/ibm/db2/V10.5
***********************************************************
Install into default directory (/opt/ibm/db2/V10.5) ? [yes/no]
yes
Specify one of the following keywords to install DB2 products.
SERVER
CONSV
EXP
CLIENT
RTCL
Enter "help" to redisplay product names.
Enter "quit" to exit.
***********************************************************
SERVER
***********************************************************
Do you want to install the DB2 pureScale Feature? [yes/no]
no
DB2 installation is being initialized.
Total number of tasks to be performed: 48
Total estimated time for all tasks to be performed: 1873 second(s)
Task #1 start
Description: Checking license agreement acceptance
Estimated time 1 second(s)
Task #1 end
Task #2 start
Description: Base Client Support for installation with root privileges
Estimated time 3 second(s)
Task #2 end
...2.4 Manually configuring after installation:
Create groups and user IDs for db2
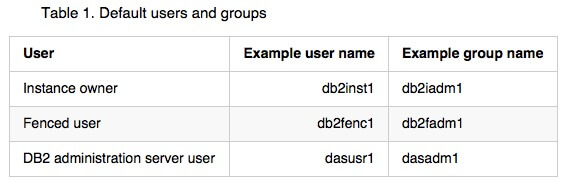
- Create groups:
1
2
3groupadd -g 999 db2iadm1
groupadd -g 998 db2fadm1
groupadd -g 997 dasadm1 - Create users :
1
2
3useradd -u 1004 -g db2iadm1 -m -d /home/db2inst1 db2inst1
useradd -u 1003 -g db2fadm1 -m -d /home/db2fenc1 db2fenc1
useradd -u 1002 -g dasadm1 -m -d /home/dasusr1 dasusr1 - Set initial password:
1
2
3passwd db2inst1
passwd db2fenc1
passwd dasusr1
- Create groups:
Create a DB2 Administration Server (DAS).
Run thedascrtcommand:DB2DIR/instance/dascrt -u dasusr1(DB2DIR specifies the path where the DB2 database product was installed)1
2
3[root@node3 server]# cd /opt/ibm/db2/V10.5/instance/
[root@node3 instance]# ./dascrt -u dasusr1
DBI1070I Program dascrt completed successfully.Create an instance.
Run thedb2icrtcommand:DB2DIR/instance/db2icrt -a server -u db2fenc1 db2inst11
2
3
4[root@node3 instance]# ./db2icrt -a server -u db2fenc1 db2inst1
DBI1446I The db2icrt command is running.
...
DBI1070I Program db2icrt completed successfully.Configure TCP/IP communications for a DB2 instance
Add the Connection entry to the services file:
db2c_db2inst1 50000/tcp # DB2 connection service port
(if you want to use the default port 60006, skip this step)1
2
3
4
5
6
7
8
9
10
11
12
13
14
15[root@node3 ~]# sed -i '$a db2c_db2inst1 50000/tcp' /etc/services
[root@node3 ~]# cat /etc/services |grep db2
ibm-db2 523/tcp # IBM-DB2
ibm-db2 523/udp # IBM-DB2
questdb2-lnchr 5677/tcp # Quest Central DB2 Launchr
questdb2-lnchr 5677/udp # Quest Central DB2 Launchr
qdb2service 45825/tcp # Qpuncture Data Access Service
qdb2service 45825/udp # Qpuncture Data Access Service
DB2_db2inst1 60006/tcp
DB2_db2inst1_1 60007/tcp
DB2_db2inst1_2 60008/tcp
DB2_db2inst1_3 60009/tcp
DB2_db2inst1_4 60010/tcp
DB2_db2inst1_END 60011/tcp
db2c_db2inst1 50000/tcpUpdate the database manager configuration file on the server:
Log on as db2inst1 and enter the following commands:db2 update database manager configuration using svcename SERIVCE_NAME, where SERIVCE_NAME can be 50000 or db2c_db2inst1 .1
2
3
4
5
6[root@node3 ~]# su db2inst1
[db2inst1@node3 ~]$ db2 update database manager configuration using svcename 50000
DB20000I The UPDATE DATABASE MANAGER CONFIGURATION command completed successfully.
[db2inst1@node3 ~]$ db2 get dbm cfg |grep SVCENAME
TCP/IP Service name (SVCENAME) = 50000
SSL service name (SSL_SVCENAME) =Setting communication protocols for a DB2 instance:
db2set DB2COMM=tcpip1
2
3
4
5
6
7[db2inst1@node3 server]$ db2set DB2COMM=tcpip
[db2inst1@node3 server]$ db2set -all
[i] DB2COMM=TCPIP
[i] DB2AUTOSTART=NO
[g] DB2SYSTEM=node3
[g] DB2INSTDEF=db2inst1
[g] DB2ADMINSERVER=dasusr1
install db2 fix pack
3.1 uncompress fix packs:
1
2[root@node3 ~]# gunzip -c v10.5fp5_linuxx64_universal_fixpack.tar.gz | tar -xvf -
[root@node3 ~]# cd universal3.2 check the installation
1
2
3
4
5[root@node3 universal]# ./db2ls
Install PathLevel Fix Pack Special Install Number Install Date Installer UID
---------------------------
/opt/ibm/db2/V10.5 10.5.0.3 3 Tue Oct 27 04:07:25 2015 CST 03.3 install the fix pack:
When installing the fix pack, db2 should not be running. So, if db2 processes and DAS have been started, stop them([see sector 6]). Then enter./installFixPack -b DB2DIR1command.1
2
3
4
5
6
7
8
9
10
11
12
13
14
15
16
17
18
19
20
21
22[root@node3 universal]# ./installFixPack -b /opt/ibm/db2/V10.5/
Do you want to choose a different installation directory for the fix pack? [yes/no]
------------------------------------------------------------------------------------
no
DBI1017I installFixPack is updating the DB2 product(s) installed in
location /opt/ibm/db2/V10.5/.
DB2 installation is being initialized.
Total number of tasks to be performed: 46
Total estimated time for all tasks to be performed: 1757 second(s)
Task #1 start
Description: Stopping DB2 Fault Monitor
Estimated time 10 second(s)
Task #1 end
...
[root@node3 universal]# ./db2ls
Install PathLevel Fix Pack Special Install Number Install Date Installer UID
---------------------------
/opt/ibm/db2/V10.5 10.5.0.5 5 Fri May 8 18:22:10 2015 HKT 0
apply db2 licenses
4.1 Extract ESE_AUSI_QS_Activation_10.5.0.4.zip, get the license file db2ese_t.lic
4.2 log on as db2inst1, run the command:
db2licm -a db2ese_t.lic1
2
3[db2inst1@node3 ~]$ db2licm -a db2ese_u.lic
LIC1402I License added successfully.
LIC1426I This product is now licensed for use as outlined in your License Agreement. USE OF THE PRODUCT CONSTITUTES ACCEPTANCE OF THE TERMS OF THE IBM LICENSE AGREEMENT, LOCATED IN THE FOLLOWING DIRECTORY: "/opt/ibm/db2/V10.5/license/en_US.iso88591"4.3 check it:
1
2
3
4
5
6
7
8
9
10
11
12
13[db2inst1@node3 ~]$ db2licm -l
Product name: "DB2 Enterprise Server Edition"
License type: "Authorized User Single Install"
Expiry date: "Permanent"
Product identifier: "db2ese"
Version information: "10.5"
Enforcement policy: "Soft Stop"
Number of licensed authorized users: "25"
Features:
IBM DB2 BLU Acceleration In-Memory Offering: "Not licensed"
IBM DB2 Performance Management Offering: "Not licensed"
IBM DB2 Encryption Offering: "Not licensed"
IBM DB2 Business Application Continuity Offering: "Not licensed"
some common db2 commands
- start db2
1
2log on as db2inst1: db2start
log on as dasadmin: db2admin start - stop db2
1
2
3
4
5log on as db2inst1:
db2 force applications all
db2 terminate
db2stop
log on as dasadmin: db2admin stop - check db version
db2ls - list all database
db2 list db directory - connect to database
db2 connect to db DATABASE_NAME user USER_NAME using PASSWORD - list tables
db2 list tables for schema SCHEMA_NAME